
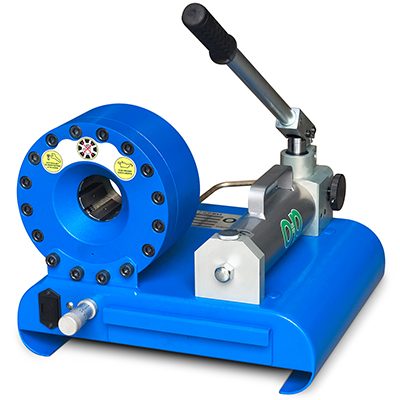
Image 1: Hand-pump style crimper
Fluid Power World Contributing Editor Josh Cosford gave a webinar presentation on Proper Hose Assembly Guidelines. The transcript has been divided into an 8-part blog post series. The following excerpt from that webinar transcript is the seventh part of the series.
Looking at Image 1 you have a fairly economical hand-pump style crimper. Let’s look at the die sets, those are required. On the bottom left-hand side you have a micrometer that sets your adjustment depending on what dies that you have.
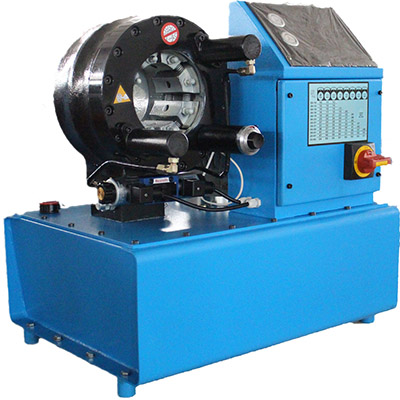
Image 2: Semi-automatic crimper
Upgrading a bit, we have a hydraulic-powered semi-automatic crimper (Image 2). You still have to adjust some setting on this, but it’s all powered, no hand-pumping required.
If you’re a heavy duty shop and all you do all day is hydraulic hose, you’re going to need something like a CMC crimper (Image 3). Everything is computer programmed. If you look below you can see all the different types of die sets that are required for installing different types of hose, different size fitting. The finished diameter of a hose is very particular, so having a full complement of these dies is required if you want do every diameter of hose.
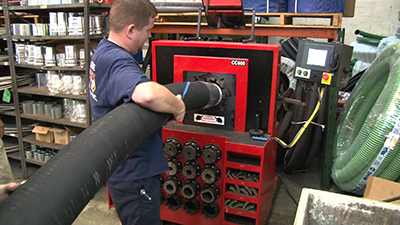
Image 3: CMC Crimper
Looking back at Image 2, if you see inside that black head there are those 8 little die holders. When you have 8 of them it’s great for doing 90° assemblies. You can imagine that each one of those dies is 45° spaces around. If you had an application where you were doing dozens or hundreds, who knows how many hoses, and you have one that is perpendicular or 90° to another, this one is really easy for lining up. Some of them have six dies. The visual gets a little harder to imagine. Doing 90° you have to put markings on the machine or what not to do that, but I prefer this style here with the 8 dies.
 When it comes to choosing your fittings, they vary vastly. It’s going to depend on which hose selection you have, how many wires it is, what the finished OD is going to be, which fittings you’re using. If you have ever looked in the catalog for a hydraulic fittings, especially for hose ends, there’s thousands of choices. Nearly any combination of fitting and hose is available. If you’re not comfortable with making the right choice, make sure you consult your local hose shop and they’ll help you.
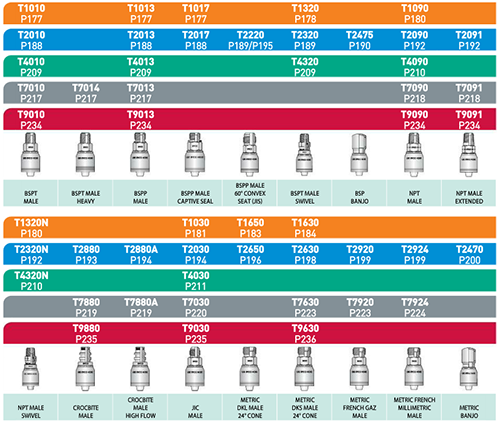
Also, every catalog will specify to you which types of fittings you will use and how they will be crimped based on what kind of hose you’re using as well. One set of fittings might be usable for 1 or 2-wire braided hose, but they might not be suitable for a 4-wire spiral hose. This particular page is going to be all the information you need when it comes to actually crimping your hose.
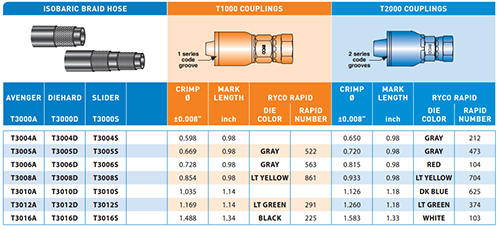
Example page from a catalogue depicting which fittings are appropriate for which hose and how they should be crimped.
Once you have your hose and it’s crimped, if you look at the example image on the left, you’ll see dimensions for a specified crimp diameter. The tolerance is 0.008 of an inch. In this case, you will crimp the hose with the settings on your machine. You’ll adjust the machie so its final crimp diameter, in this case we’ll take the first one, is 0.598. If you take out your calipers and measure it, that’s what you want your measurement to say. Depending on what fitting you use, depending on what hose you’re using, all your crimp specs will be different. Just make sure that you measure it accurately; don’t guess.
The crimp spec is important because not only does it make sure that you have a safe crimp, that you don’t have a hose fitting that pops off within the first minutes or pressure cycles or whatever, the most reliable crimp is the most accurate one. Also, because if you over crimp, it may stay on but it also might just eat through the carcass and the middle braiding and pop off anyway. You also crush the ID of the hose and you restrict flow. Ensuring that you have an accurate crimp, again in this example, specified within 0.008 of an inch, that really tells you how specific a crimp should be.
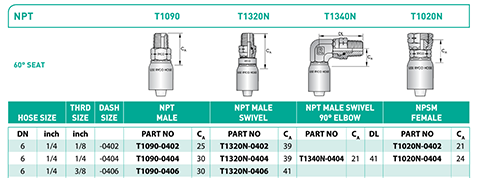
These are examples of some MPT fittings. Starting from the left you have a straight one, straight swivel, 90 degree swivel and female swivel. Your options are endless.
For your catalog, when you’re doing a hose crimp, make sure you get as close to that number as possible. Anywhere outside that should be redone. It’s just not worth messing around for an $8 fitting. The time it takes to redo it, there’s no point in doing anything but the right way. You measure with calipers. You’d do your hose crimp and measure right across the center points and that’s your most accurate way.
Now a little bit about delivery: This is if you are an OEM or a large company and you need to consider the specifics of when you’re going to get your hose, how many do you need, how soon do you need them, just any special tagging or lay line information. The lay line is the embossed part numbers in the description that you see on a hydraulic hose. If you’re a large OEM and you want some resell business to come your way, you might have hose assemblies made up with all of your own identification numbers on it so that all re-sale sales go to you. You could have some information about application or temperature or whatnot.
The post Proper Hose Assembly Guidelines, Part 7 – Crimping appeared first on Hose Assembly Tips.
Filed Under: Hose & Tubing, Hose Assembly Tips